Next: About this document ...
Up: REFERENCES
Previous: REFERENCES
Following the demonstration done by Biondi (2005),
the derivative of the depth with respect to the subsurface offset, at
a constant image point, and the derivative of the depth with respect to the
image point, at a constant subsurface offset are given by the following:
|  |
(19) |
and
|  |
(20) |
where the partial derivatives are:
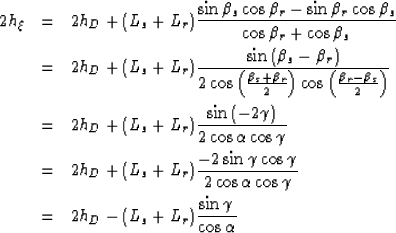
| ![\begin{eqnarray}
\frac{\partial z_\xi}{\partial \alpha} &=&
-\frac{L}{\cos{\alph...
...\frac{(S_r-S_s)\tan{\alpha}\sin{\gamma}}{\cos^2{\gamma}}
\right ].\end{eqnarray}](img46.gif) |
|
| |
| |
| |
| |
| (21) |
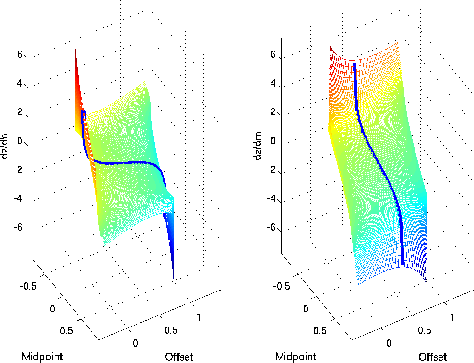
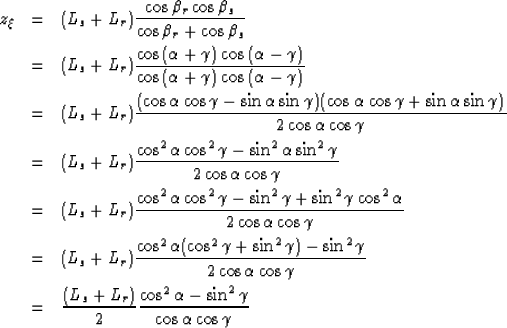
Figure ![[*]](http://sepwww.stanford.edu/latex2html/cross_ref_motif.gif) presents the analytical solutions for the tangent to the
impulse response. This was done for an impulse at a PS-travel time of 2 s, and a
presents the analytical solutions for the tangent to the
impulse response. This was done for an impulse at a PS-travel time of 2 s, and a  value
of 2. The left panel shows the solution for equation (19). The right panel
shows the solution for equation (20). The solid lines superimpose on both
surfaces represents one section of the numerical derivative to the impulse response.
The perfect correlation between the analytical and numerical solution validates our
analytical formulations. This results supports the analysis presented with the
kinematic equations.
ang_cwv_wei_surf
value
of 2. The left panel shows the solution for equation (19). The right panel
shows the solution for equation (20). The solid lines superimpose on both
surfaces represents one section of the numerical derivative to the impulse response.
The perfect correlation between the analytical and numerical solution validates our
analytical formulations. This results supports the analysis presented with the
kinematic equations.
ang_cwv_wei_surf
Figure 10 Validation of the analytical solutions for the
tangent to the impulse response, the surface represents the analytical solutions and
superimpose is the cut with the numerical derivative. Left: For equation (19).
Right: For equation (20)
analytical solutions for the tangent of
the spreading surface for different values of


B
This section proofs the equivalence between the parametric equations
14, that is a direct result of trigonometry and geometry
on the Figure , with the parametric equations
17, which the same equations presented by previous authors.
It is important to note that even though both parametric equations
14 and 17 are equivalent, the difference relies on
the conceptual definitions of the angles involved.
The proof of this section is pure trigonemetry, and the reader
can safely skip this entire Appendix. However, this Appendix is here
to show that the use of our equations is valid.
First, we rewrite  and
and  as function of
  and
and
 by simple algebraic manipulation of equations 3.
|  |
(22) |
The first proof is the first parametric equation:
The second parametric equation is:
The third parametric equation is:
Next: About this document ...
Up: REFERENCES
Previous: REFERENCES
Stanford Exploration Project
5/3/2005